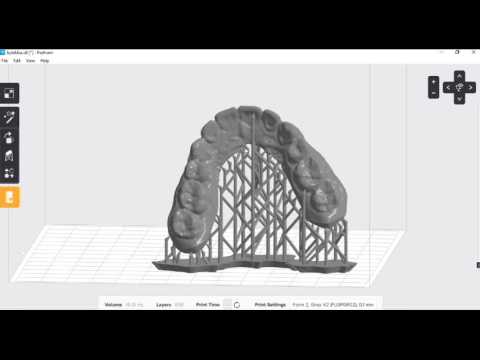
What up YouTube today, we are going to be talking about arranging our dental arch in preform and preparing it for 3D printing. - The quickest and most efficient way to do this is to print the model flat on its base. - We are just going to be working with these three icons here. - The top one is a button called select base, located at the bottom. - By choosing that, it gives us a cool suction-cup tool. - Clicking where we want it, it will plop it flat down. - We can see that it is nice and flat on the build plate, which is represented by the grid. - We have the option to move the arch using the sphere icon. - We should never choose the button that is marked with an X, as it is not suitable for the dental world. - The sphere icon also allows us to move the model. - For now, we will just click and drag. - Let's check the print time, which is 18 minutes. - Now, if we add some force to the model using the middle button and the supports icon, the print time increases to an hour and 41 minutes. - We can edit the supports if needed, especially when arranging multiple models to print overnight. - To do this, we can select the sphere icon and bring the model to a slanted position. - This allows us to line them up easily. - Let's generate some supports and see the new print time, which is two hours and 43 minutes. - Usually, I prefer the quickest and most efficient way to print, especially for debonding in the morning. - We can deselect the supports by using the clear button and go back to selecting...
Award-winning PDF software


Video instructions and help with filling out and completing Why 8850 Form Pre